Microsoft have provided several documents detailing the usage of the latest group policy settings for a Server 2008r environment, with Windows7. Sadly they havent released a list of 'new' group policy settings for windows 7. I've been able to identify around 200, which I am listing below;
NOTE: These will only work with a server 2008r2 backend, and Windows 7 desktop. If your looking to roll out windows 7 after upgrading your DCs, these are the group policies you should be looking to apply, in addition to ones you are already using.
AppCompat.admx Turn off Application Telemetry
AppCompat.admx Turn off Problem Steps Recorder
AppCompat.admx Turn off Program Inventory
AppCompat.admx Turn off SwitchBack Compatibility Engine
AutoPlay.admx Turn off Autoplay for non-volume devices
AutoPlay.admx Turn off Autoplay for non-volume devices
Biometrics.admx Allow domain users to log on using biometrics
Biometrics.admx Allow the use of biometrics
Biometrics.admx Allow users to log on using biometrics
Biometrics.admx Timeout for fast user switching events
Bits.admx Do not allow the BITS client to use Windows Branch Cache
Bits.admx Set up a maintenance schedule to limit the maximum network bandwidth used for BITS background transfers
Bits.admx Set up a work schedule to limit the maximum network bandwidth used for BITS background transfers
ControlPanelDisplay.admx Load a specific theme
ControlPanelDisplay.admx Prevent changing mouse pointers
ControlPanelDisplay.admx Prevent changing sounds
Desktop.admx Turn off Aero Shake window minimizing mouse gesture
DeviceInstallation.admx Configure device installation time-out
DeviceInstallation.admx Prevent device metadata retrieval from the Internet
DeviceInstallation.admx Prevent Windows from sending an error report when a device driver requests additional software during installation
DeviceInstallation.admx Specify search order for device driver source locations
DeviceInstallation.admx Time (in seconds) to force reboot when required for policy changes to take effect
DeviceRedirection.admx Prevent redirection of devices that match any of these device Ids
DeviceRedirection.admx Prevent redirection of USB devices
EnhancedStorage.admx Allow Enhanced Storage certificate provisioning
EnhancedStorage.admx Allow only USB root hub connected Enhanced Storage devices
EnhancedStorage.admx Configure list of Enhanced Storage devices usable on your computer
EnhancedStorage.admx Configure list of IEEE 1667 silos usable on your computer
EnhancedStorage.admx Do not allow non-Enhanced Storage removable devices
EnhancedStorage.admx Do not allow password authentication of Enhanced Storage devices
EnhancedStorage.admx Lock Enhanced Storage when the computer is locked
Explorer.admx Set a support web page link
Explorer.admx Turn off Data Execution Prevention for Explorer
fthsvc.admx Configure Scenario Execution Level
Help.admx Turn off Data Execution Prevention for HTML Help Executible
kdc.admx Use forest search order
kerberos.admx Require strict target SPN match on remote procedure calls
kerberos.admx Use forest search order
LanmanServer.admx Hash Publication for BranchCache
Logon.admx Always use custom logon background
MSDT.admx Microsoft Support Diagnostic Tool: Turn on MSDT interactive communication with Support Provider
NCSI.admx Corporate DNS Probe Host Address
NCSI.admx Corporate DNS Probe Host Name
NCSI.admx Corporate Site Prefix List
NCSI.admx Corporate Website Probe URL
NCSI.admx Domain Location Determination URL
NetworkConnections.admx Do not show the "local access only" network icon
NetworkConnections.admx Require domain users to elevate when setting a network's location
NetworkConnections.admx Route all traffic through the internal network
NetworkProjection.admx Network Projector Port Setting
OfflineFiles.admx Configure Background Sync
OfflineFiles.admx Enable Transparent Caching
OfflineFiles.admx Exclude files from being cached
PeerToPeerCaching.admx Configure BranchCache for network files
Power.admx Allow Applications to Prevent Automatic Sleep (On Battery)
Power.admx Allow Applications to Prevent Automatic Sleep (Plugged In)
Power.admx Allow Automatic Sleep with Open Network Files (On Battery)
Power.admx Allow Automatic Sleep with Open Network Files (Plugged In)
Power.admx Reduce Display Brightness (On Battery)
Power.admx Reduce Display Brightness (Plugged In)
Power.admx Reserve Battery Notification Level
Power.admx Specify the Display Dim Brightness (On Battery)
Power.admx Specify the Display Dim Brightness (Plugged In)
Power.admx Specify the Unattended Sleep Timeout (On Battery)
Power.admx Specify the Unattended Sleep Timeout (Plugged In)
Power.admx Turn On Desktop Background Slideshow (On Battery)
Power.admx Turn On Desktop Background Slideshow (Plugged In)
Printing.admx Execute print drivers in isolated processes
Printing.admx Extend Point and Print connection to search Windows Update
Printing.admx Override print driver execution compatibility setting reported by print driver
RacWmiProv.admx Configure Reliability WMI Providers
ReAgent.admx Allow restore of system to default state
RemovableStorage.admx CD and DVD: Deny execute access
RemovableStorage.admx Floppy Drives: Deny execute access
RemovableStorage.admx Removable Disks: Deny execute access
RemovableStorage.admx Tape Drives: Deny execute access
scripts.admx Run Windows PowerShell scripts first at computer startup, shutdown
scripts.admx Run Windows PowerShell scripts first at user logon, logoff
scripts.admx Run Windows PowerShell scripts first at user logon, logoff
sdiageng.admx Configure Security Policy for Scripted Diagnostics
sdiageng.admx Troubleshooting: Allow users to access and run Troubleshooting Wizards
sdiageng.admx Troubleshooting: Allow users to access online troubleshooting content on Microsoft servers from the Troubleshooting Control Panel (via the Windows Online Troubleshooting Service - WOTS)
sdiagschd.admx Configure Scheduled Maintenance Behavior
SearchOCR.admx Force TIFF IFilter to perform OCR for every page in a TIFF document
SearchOCR.admx Select OCR languages from a code page
Sensors.admx Turn off location
Sensors.admx Turn off location
Sensors.admx Turn off location scripting
Sensors.admx Turn off location scripting
Sensors.admx Turn off sensors
Sensors.admx Turn off sensors
ShapeCollector.admx Turn off handwriting personalization data sharing
ShapeCollector.admx Turn off handwriting personalization data sharing
Sharing.admx Prevent the computer from joining a homegroup
SmartCard.admx Allow ECC certificates to be used for logon and authentication
SmartCard.admx Notify user of successful smart card driver installation
SmartCard.admx Turn on Smart Card Plug and Play service
StartMenu.admx Add Search Internet link to Start Menu
StartMenu.admx Change Start Menu power button
StartMenu.admx Remove Downloads link from Start Menu
StartMenu.admx Remove Homegroup link from Start Menu
StartMenu.admx Remove Recorded TV link from Start Menu
StartMenu.admx Remove See More Results / Search Everywhere link
StartMenu.admx Remove Videos link from Start Menu
SystemRestore.admx Turn off Configuration
SystemRestore.admx Turn off System Restore
TabletPCInputPanel.admx Disable text prediction
TabletPCInputPanel.admx Disable text prediction
Taskbar.admx Do not allow pinning items in Jump Lists
Taskbar.admx Do not allow pinning programs to the Taskbar
Taskbar.admx Do not display or track items in Jump Lists from remote locations
Taskbar.admx Remove pinned programs from the Taskbar
Taskbar.admx Remove the Action Center icon
Taskbar.admx Turn off automatic promotion of notification icons to the taskbar
Taskbar.admx Turn off feature advertisement balloon notifications
tcpip.admx 6to4 Relay Name
tcpip.admx 6to4 Relay Name Resolution Interval
tcpip.admx 6to4 State
tcpip.admx IP-HTTPS State
tcpip.admx ISATAP Router Name
tcpip.admx ISATAP State
tcpip.admx Teredo Client Port
tcpip.admx Teredo Default Qualified
tcpip.admx Teredo Refresh Rate
tcpip.admx Teredo Server Name
tcpip.admx Teredo State
TerminalServer.admx Limit audio playback quality
TerminalServer.admx Limit maximum display resolution
TerminalServer.admx Limit maximum number of monitors
TerminalServer.admx Optimize visual experience for Remote Desktop Services sessions
TerminalServer.admx Use Remote Desktop Easy Print printer driver first
TerminalServer.admx Use Remote Desktop Easy Print printer driver first
TouchInput.admx Turn off Touch Panning
TouchInput.admx Turn off Touch Panning
UserProfiles.admx Background upload of a roaming user profile's registry file while user is logged on
VolumeEncryption.admx Allow enhanced PINs for startup
VolumeEncryption.admx Choose how BitLocker-protected fixed drives can be recovered
VolumeEncryption.admx Choose how BitLocker-protected operating system drives can be recovered
VolumeEncryption.admx Choose how BitLocker-protected removable drives can be recovered
VolumeEncryption.admx Configure minimum PIN length for startup
VolumeEncryption.admx Configure use of passwords for fixed data drives
VolumeEncryption.admx Configure use of passwords for removable data drives
VolumeEncryption.admx Configure use of smart cards on fixed data drives
VolumeEncryption.admx Configure use of smart cards on removable data drives
VolumeEncryption.admx Control use of BitLocker on removable drives
VolumeEncryption.admx Deny write access to fixed drives not protected by BitLocker
VolumeEncryption.admx Deny write access to removable drives not protected by BitLocker
VolumeEncryption.admx Provide the unique identifiers for your organization
VolumeEncryption.admx Require additional authentication at startup
VolumeEncryption.admx Validate smart card certificate usage rule compliance
WindowsAnytimeUpgrade.admx Prevent Windows Anytime Upgrade from running.
WindowsAnytimeUpgrade.admx Prevent Windows Anytime Upgrade from running.
WindowsExplorer.admx Allow OpenSearch queries in Windows Explorer
WindowsExplorer.admx Allow OpenSearch queries in Windows Explorer
WindowsExplorer.admx Allow OpenSearch queries in Windows Explorer
WindowsExplorer.admx Allow OpenSearch queries in Windows Explorer
WindowsExplorer.admx Allow OpenSearch queries in Windows Explorer
WindowsExplorer.admx Allow OpenSearch queries in Windows Explorer
WindowsExplorer.admx Allow OpenSearch queries in Windows Explorer
WindowsExplorer.admx Allow OpenSearch queries in Windows Explorer
WindowsExplorer.admx Allow OpenSearch queries in Windows Explorer
WindowsExplorer.admx Allow OpenSearch queries in Windows Explorer
WindowsExplorer.admx Allow OpenSearch queries in Windows Explorer
WindowsExplorer.admx Allow OpenSearch queries in Windows Explorer
WindowsExplorer.admx Allow OpenSearch queries in Windows Explorer
WindowsExplorer.admx Allow OpenSearch queries in Windows Explorer
WindowsExplorer.admx Allow OpenSearch queries in Windows Explorer
WindowsExplorer.admx Allow OpenSearch queries in Windows Explorer
WindowsExplorer.admx Allow OpenSearch queries in Windows Explorer
WindowsExplorer.admx Allow OpenSearch queries in Windows Explorer
WindowsExplorer.admx Allow OpenSearch queries in Windows Explorer
WindowsExplorer.admx Allow OpenSearch queries in Windows Explorer
WindowsExplorer.admx Allow previewing and custom thumbnails of OpenSearch query results in Windows Explorer
WindowsExplorer.admx Allow previewing and custom thumbnails of OpenSearch query results in Windows Explorer
WindowsExplorer.admx Allow previewing and custom thumbnails of OpenSearch query results in Windows Explorer
WindowsExplorer.admx Allow previewing and custom thumbnails of OpenSearch query results in Windows Explorer
WindowsExplorer.admx Allow previewing and custom thumbnails of OpenSearch query results in Windows Explorer
WindowsExplorer.admx Allow previewing and custom thumbnails of OpenSearch query results in Windows Explorer
WindowsExplorer.admx Allow previewing and custom thumbnails of OpenSearch query results in Windows Explorer
WindowsExplorer.admx Allow previewing and custom thumbnails of OpenSearch query results in Windows Explorer
WindowsExplorer.admx Allow previewing and custom thumbnails of OpenSearch query results in Windows Explorer
WindowsExplorer.admx Allow previewing and custom thumbnails of OpenSearch query results in Windows Explorer
WindowsExplorer.admx Allow previewing and custom thumbnails of OpenSearch query results in Windows Explorer
WindowsExplorer.admx Allow previewing and custom thumbnails of OpenSearch query results in Windows Explorer
WindowsExplorer.admx Allow previewing and custom thumbnails of OpenSearch query results in Windows Explorer
WindowsExplorer.admx Allow previewing and custom thumbnails of OpenSearch query results in Windows Explorer
WindowsExplorer.admx Allow previewing and custom thumbnails of OpenSearch query results in Windows Explorer
WindowsExplorer.admx Allow previewing and custom thumbnails of OpenSearch query results in Windows Explorer
WindowsExplorer.admx Allow previewing and custom thumbnails of OpenSearch query results in Windows Explorer
WindowsExplorer.admx Allow previewing and custom thumbnails of OpenSearch query results in Windows Explorer
WindowsExplorer.admx Allow previewing and custom thumbnails of OpenSearch query results in Windows Explorer
WindowsExplorer.admx Allow previewing and custom thumbnails of OpenSearch query results in Windows Explorer
WindowsExplorer.admx Disable Known Folders
WindowsExplorer.admx Pin Internet search sites to the "Search again" links and the Start menu
WindowsExplorer.admx Pin Libraries or Search Connectors to the "Search again" links and the Start menu
WindowsExplorer.admx Remove the Search the Internet "Search again" link
WindowsExplorer.admx Turn off display of recent search entries in the Windows Explorer search box
WindowsExplorer.admx Turn off numerical sorting in Windows Explorer
WindowsExplorer.admx Turn off numerical sorting in Windows Explorer
WindowsExplorer.admx Turn off the display of snippets in Content view mode
WindowsExplorer.admx Turn off Windows Libraries features that rely on indexed file data
WindowsExplorer.admx Verify old and new Folder Redirection targets point to the same share before redirecting
Upgrading a 2008 Domain to 2008r2
This document is presuming current domain level is 2008, with all 2008 Domain Controllers.
Step 1 ? Upgrade the schema
The tools for this are provided on the Server 2008 r2 DVD, in the \support\adprep folder First copy this entire folder onto the C:\ drive of the Forest?s schema master. There are various tools online to locate your infrastructure master (if you don?t know it), but you can easily identify it using AD Users & Computers Console. Just right click on the tree root, select all tasks, and operations masters.
From an elevated command prompt, go into the adprep folder which was previously copied;
Cd c:\adprep
Type in the following command;
Adprep /forestprep
If you plan to implement any read only DCs, also run;
Adprep /rodcprep
Before doing anything else, wait at least 10 minutes. It can take up to 5 minutes for changes to replicate through the forest
Next copy the folder adprep to the infrastructure master, onto the local C:\ drive. Open up an elevated command prompt, and go into the adprep folder;
Cd c:\adprep
Type in the following command;
Adprep /domainprep /gpprep
Keep ad changes to a minimum for at least 10 minutes. The schema is now upgraded to Server 2008 r2, and can support Server 2008 r2 Domain Controllers.
Step 2 ? Upgrade each domain controller
Once the upgraded schema is in place, you can begin to upgrade your DCs.
The most import issue to address is that your DCs cannot be 32 bit. Server 2008r2 is only available in 64 bit. If you do have 32 bit DCs you will need to demote/remove and rebuild them as 64 bit Server 2008r2 DCs.
The good news is that 2008 64bit DCs can be upgraded, without having to be removed from AD. The only thing you must do first is transfer any roles off the DC whilst the upgrade takes place. This is essential, as if the upgrade fails and your server dies, you are safe in the knowledge that AD will still function.
The following article describes which AD tools can be used to identify which server?s are holding roles, and how to move them to other servers;
http://support.microsoft.com/kb/324801
You may currently have certain services running in your environment which point to specific DCs because that DC holds a specific role. As such, I would advise that after upgrading a DC you reinstate the roles onto it which it previously held. This will minimize impact. I?d also suggest doing this out of hours, or during a quiet period, so that AD changes are minimal during the process.
Once you have removed the roles from the first server you want to upgrade, just stick the Server 2008r2 DVD into the drive (or mount the ISO).
Step 3 ? The Install
Firstly, Microsoft suggests running their memory (RAM) checker before performing an upgrade, this can be found here;
http://go.microsoft.com/fwlink/?LinkId=50362
The disc should auto-run, if it doesn?t just run setup.exe from the root.
The only option you have when the flash screen appears is INSTALL. Click on Install.
You will get an option next to go online for the latest updates to the installation. I would always suggest choosing this option. As of 27 Jan 2010, choosing the option to download the latest updates took an extra 1 second, and downloaded around 1Mbs worth of updates.
Next you get a list of versions of 2008r2 server available on the DVD. Changing varieties can be tricky/impossible. For example you can?t go from Data Centre edition to Enterprise Edition. In most cases you will simply be choosing the same version as the server is already running. Eg, your DC is currently running 2008 Enterprise 64 bit Full Install (not core), so choose the 2008 R2 Enterprise Full Installation.
After you click next accept the license terms.
You will then get two options. Upgrade or Custom. Choose upgrade.
You will get a warning about any issues which may exist. The generic one seems to be that you should check that any software installed on the server is supported to run on Server 2008 r2. It would be very unlikely that software which works on 2008 wouldn?t work on 2008r2, but the warning is there. If any windows updates have been performed you may also be told that you need to reboot the server before running the upgrade.
Once you?re ready click next, and Windows will start copying files and upgrading. The warning indicates that this can take several hours, but in practice seems to complete in around 60 minutes, as the upgrade only copies around 2Gb of data. The server will reboot part way through expanding files (around 18%). After the ?installing features and updates? step the server will reboot again, during which the machines registry settings will be updated. One final reboot will take place after ?Transferring Programs & Settings?. The loading screen will state ?Setup Is Preparing Your Computer For First Use?. Don?t worry, it?s still the same DC, just a slightly ambiguous message.
Once the boot up completes the server is ready to use, and you can restore any roles back onto it which you might have transferred away.
Thats it.
This document is presuming current domain level is 2008, with all 2008 Domain Controllers.
Step 1 ? Upgrade the schema
The tools for this are provided on the Server 2008 r2 DVD, in the \support\adprep folder First copy this entire folder onto the C:\ drive of the Forest?s schema master. There are various tools online to locate your infrastructure master (if you don?t know it), but you can easily identify it using AD Users & Computers Console. Just right click on the tree root, select all tasks, and operations masters.
From an elevated command prompt, go into the adprep folder which was previously copied;
Cd c:\adprep
Type in the following command;
Adprep /forestprep
If you plan to implement any read only DCs, also run;
Adprep /rodcprep
Before doing anything else, wait at least 10 minutes. It can take up to 5 minutes for changes to replicate through the forest
Next copy the folder adprep to the infrastructure master, onto the local C:\ drive. Open up an elevated command prompt, and go into the adprep folder;
Cd c:\adprep
Type in the following command;
Adprep /domainprep /gpprep
Keep ad changes to a minimum for at least 10 minutes. The schema is now upgraded to Server 2008 r2, and can support Server 2008 r2 Domain Controllers.
Step 2 ? Upgrade each domain controller
Once the upgraded schema is in place, you can begin to upgrade your DCs.
The most import issue to address is that your DCs cannot be 32 bit. Server 2008r2 is only available in 64 bit. If you do have 32 bit DCs you will need to demote/remove and rebuild them as 64 bit Server 2008r2 DCs.
The good news is that 2008 64bit DCs can be upgraded, without having to be removed from AD. The only thing you must do first is transfer any roles off the DC whilst the upgrade takes place. This is essential, as if the upgrade fails and your server dies, you are safe in the knowledge that AD will still function.
The following article describes which AD tools can be used to identify which server?s are holding roles, and how to move them to other servers;
http://support.microsoft.com/kb/324801
You may currently have certain services running in your environment which point to specific DCs because that DC holds a specific role. As such, I would advise that after upgrading a DC you reinstate the roles onto it which it previously held. This will minimize impact. I?d also suggest doing this out of hours, or during a quiet period, so that AD changes are minimal during the process.
Once you have removed the roles from the first server you want to upgrade, just stick the Server 2008r2 DVD into the drive (or mount the ISO).
Step 3 ? The Install
Firstly, Microsoft suggests running their memory (RAM) checker before performing an upgrade, this can be found here;
http://go.microsoft.com/fwlink/?LinkId=50362
The disc should auto-run, if it doesn?t just run setup.exe from the root.
The only option you have when the flash screen appears is INSTALL. Click on Install.
You will get an option next to go online for the latest updates to the installation. I would always suggest choosing this option. As of 27 Jan 2010, choosing the option to download the latest updates took an extra 1 second, and downloaded around 1Mbs worth of updates.
Next you get a list of versions of 2008r2 server available on the DVD. Changing varieties can be tricky/impossible. For example you can?t go from Data Centre edition to Enterprise Edition. In most cases you will simply be choosing the same version as the server is already running. Eg, your DC is currently running 2008 Enterprise 64 bit Full Install (not core), so choose the 2008 R2 Enterprise Full Installation.
After you click next accept the license terms.
You will then get two options. Upgrade or Custom. Choose upgrade.
You will get a warning about any issues which may exist. The generic one seems to be that you should check that any software installed on the server is supported to run on Server 2008 r2. It would be very unlikely that software which works on 2008 wouldn?t work on 2008r2, but the warning is there. If any windows updates have been performed you may also be told that you need to reboot the server before running the upgrade.
Once you?re ready click next, and Windows will start copying files and upgrading. The warning indicates that this can take several hours, but in practice seems to complete in around 60 minutes, as the upgrade only copies around 2Gb of data. The server will reboot part way through expanding files (around 18%). After the ?installing features and updates? step the server will reboot again, during which the machines registry settings will be updated. One final reboot will take place after ?Transferring Programs & Settings?. The loading screen will state ?Setup Is Preparing Your Computer For First Use?. Don?t worry, it?s still the same DC, just a slightly ambiguous message.
Once the boot up completes the server is ready to use, and you can restore any roles back onto it which you might have transferred away.
Thats it.

I've just been working on a monitoring PC which have, which uses server perfmon to monitor the health of all our servers. Graphs include items such as CPU load, RAM available, and disk queue. I've also put a little system in place which will send an alert to twitter in the event of a server crash, or non-responsive ping;
It requires 2 batch files. The first one, looks like this;
--------------------------------------
@ECHO OFF
cls
REM Send 1 ping to server
ping %1 -n 1
IF %errorlevel% == 1 goto ServerFail
EXIT
:ServerFail
REM The next ping is just to force a few seconds of delay befor re-testing
@ping 127.0.0.1
@ping %1 -n 1
IF %errorlevel% == 1 goto ServerFail2
EXIT
:ServerFail2
CLS
@echo Server %1 Failed to ping on more than one occasion
tweetc "Server %1 was showing communication issues at %TIME% on %DATE%"
--------------------------------------
When calling the bat file it takes one parameter, which is the server name or IP address.
The second batch file simply calls pinger.bat for every server we want to run a check against.
You will notice a command in there "tweetc". This is a niftly little utility which allows you to tweet via the command line in windows.
If a server fails to ping, a delay is implemented, and then another ping test is done. If the second test fails, the message is sent to twitter saying "Server whatever was showing communication issues at %TIME% on %DATE%"
Its fairly crude in that its only relying on ping as a test, but its a good front line, and can be used in conjunction with more complex reports such as SMTP traps, or even using event logs.
If you want to see the live twitter go to http://twitter.com/bcolservers There isnt much on there at the moment aside from testing, and hopefully there never will be!
It requires 2 batch files. The first one, looks like this;
--------------------------------------
@ECHO OFF
cls
REM Send 1 ping to server
ping %1 -n 1
IF %errorlevel% == 1 goto ServerFail
EXIT
:ServerFail
REM The next ping is just to force a few seconds of delay befor re-testing
@ping 127.0.0.1
@ping %1 -n 1
IF %errorlevel% == 1 goto ServerFail2
EXIT
:ServerFail2
CLS
@echo Server %1 Failed to ping on more than one occasion
tweetc "Server %1 was showing communication issues at %TIME% on %DATE%"
--------------------------------------
When calling the bat file it takes one parameter, which is the server name or IP address.
The second batch file simply calls pinger.bat for every server we want to run a check against.
You will notice a command in there "tweetc". This is a niftly little utility which allows you to tweet via the command line in windows.
If a server fails to ping, a delay is implemented, and then another ping test is done. If the second test fails, the message is sent to twitter saying "Server whatever was showing communication issues at %TIME% on %DATE%"
Its fairly crude in that its only relying on ping as a test, but its a good front line, and can be used in conjunction with more complex reports such as SMTP traps, or even using event logs.
If you want to see the live twitter go to http://twitter.com/bcolservers There isnt much on there at the moment aside from testing, and hopefully there never will be!
Monday

A little known feature which many of our users seem to find useful has been Shadow Copies. Often used from an Admin point of view, by systems such as Virtual Machine Manager, shadow copies can also be used by the end users. This allows people to restore their own lost/deleted files, and roll back to a previous version.
It does have its disadvantages, such as the number of available previous version available, and the overhead on storage and disk utilization, but overall it reduces calls to the helpdesk, provides users with a faster way to recover lost data, and minimizes the time your backup administrator has to spend sifting through tapes for lost files.
Video tutorial is here;
It does have its disadvantages, such as the number of available previous version available, and the overhead on storage and disk utilization, but overall it reduces calls to the helpdesk, provides users with a faster way to recover lost data, and minimizes the time your backup administrator has to spend sifting through tapes for lost files.
Video tutorial is here;

I thought it would be worth a post on my recent experiences with an iSCSI San, and a Server 2008 Cluster. First off this is using the Release 1 of 2008, not R2 which is currently in BETA and has extended support for iSCSI.
The situation we wanted to use iSCSI San is probably much the same as most, virtualization. We are using Hyper-v along with SC Virtual Machine Manager 2008.
I’ve managed to put this into a nine step process, but if you have questions about any of the steps drop me an email;
1.Setup your SAN, install Server 2008 on desired number of nodes in the cluster, and use the MS iSCSI initiator and MPIO to connect to the SAN. Your SAN provider may provide specific tools to assist with this, such as DELL’s host integration toolkit for the Equillogic units.
2.Validate and create the cluster using Failover Cluster Management
3.Create a very small (1.5GB) LUN on your SAN, this will be used for the Witness Disk by 2008, and holds important configuration information about the cluster. Also create a number of LUNS for hosting virtual machines. Size doesn’t matter too much at this stage as they can be extended using the SAN, and Server 2008 disk management.
4.Connect all the nodes in cluster to the LUNS. Bring online, initialise and format the LUNS. Your best bet is to use a GUID partition, without a drive letter. Otherwise you may end up running out of letters in the alphabet if you have a large number of VMs.
5.Using Failover Cluster Management, add the disks into the cluster, and ensure that the small 1.5GB LUN is set as the Witness Disk. Quorum settings will depend on the number of nodes in the cluster, but the wizard does advise accordingly.
6.Using SCVMM, add one of the nodes from the cluster as a host. VMM will automatically detect that this is a clustered node and add all the other nodes.
7.Ensure that the status of each node shows everything being upto date, and check the properties of the cluster and make sure there is available storage.
8.Create a VM and add it to one of the nodes in the cluster.
9.Test functionality by shutting down the node holding the new VM, and ensure that another node takes over.
When you create your VMs, be sure to set them as highly-available. The above should give you the ability to create highly available VMs, ensuring that if node or nodes in the cluster fail, the VMs will continue to function.
1.Setup your SAN, install Server 2008 on desired number of nodes in the cluster, and use the MS iSCSI initiator and MPIO to connect to the SAN. Your SAN provider may provide specific tools to assist with this, such as DELL’s host integration toolkit for the Equillogic units.
2.Validate and create the cluster using Failover Cluster Management
3.Create a very small (1.5GB) LUN on your SAN, this will be used for the Witness Disk by 2008, and holds important configuration information about the cluster. Also create a number of LUNS for hosting virtual machines. Size doesn’t matter too much at this stage as they can be extended using the SAN, and Server 2008 disk management.
4.Connect all the nodes in cluster to the LUNS. Bring online, initialise and format the LUNS. Your best bet is to use a GUID partition, without a drive letter. Otherwise you may end up running out of letters in the alphabet if you have a large number of VMs.
5.Using Failover Cluster Management, add the disks into the cluster, and ensure that the small 1.5GB LUN is set as the Witness Disk. Quorum settings will depend on the number of nodes in the cluster, but the wizard does advise accordingly.
6.Using SCVMM, add one of the nodes from the cluster as a host. VMM will automatically detect that this is a clustered node and add all the other nodes.
7.Ensure that the status of each node shows everything being upto date, and check the properties of the cluster and make sure there is available storage.
8.Create a VM and add it to one of the nodes in the cluster.
9.Test functionality by shutting down the node holding the new VM, and ensure that another node takes over.
When you create your VMs, be sure to set them as highly-available. The above should give you the ability to create highly available VMs, ensuring that if node or nodes in the cluster fail, the VMs will continue to function.
Thursday
Going back to another problem, I've decided that in order to create VMs on-the-fly, I'm going to need a list of MAC-Addresses which are already in our DHCP server. This will mean not needing to use the netsh command to populate DHCP, and will give us a little more control.
So I need a text file containing all the MAC's which are DHCP enabled. I need to use the first MAC in the file, then delete it from the file (so it doesnt get used again). Powershell to the rescue yet again....and I can even use this within my VM creation script to streamline the whole process.
In the following example the input text file is called c:\test.txt and contains a basic list.
-----------------------------------------------------
#load the file into a string called file
$file=get-content "C:\test.txt"
#$file[0] represents the first line of data......do with as your wish
delete the data which was in the first line
$file[0]=""
#output it to a tempfile
$file out-file "C:\tempfile.txt"
#delete the original file
Remove-Item c:\test.txt
#delete any empty lines from the temp file, and save it as the original name
cat c:\tempfile.txt where {$_ -notmatch "^$" } > c:\test.txt
-----------------------------------------------------
So I need a text file containing all the MAC's which are DHCP enabled. I need to use the first MAC in the file, then delete it from the file (so it doesnt get used again). Powershell to the rescue yet again....and I can even use this within my VM creation script to streamline the whole process.
In the following example the input text file is called c:\test.txt and contains a basic list.
-----------------------------------------------------
#load the file into a string called file
$file=get-content "C:\test.txt"
#$file[0] represents the first line of data......do with as your wish
delete the data which was in the first line
$file[0]=""
#output it to a tempfile
$file out-file "C:\tempfile.txt"
#delete the original file
Remove-Item c:\test.txt
#delete any empty lines from the temp file, and save it as the original name
cat c:\tempfile.txt where {$_ -notmatch "^$" } > c:\test.txt
-----------------------------------------------------
Tuesday
I've been to a few Microsoft conferences where people contantly bang on about PowerShell. Until now its been something I have tried to avoid, as it looks a little bit too much like DOS for my liking!
However, working on another project has lead me to look into powershell for creating Virtual Machines, and I've been blown away by what it can do.
The beauty of MS System Centre Products is that they all execute tasks using powershell, even if you use an admin console to create the task. You could quite happily never know that powershell was being used, and I imagine 90% of users never need to know. The brilliant thing is tha whenever you do something with the GUI, be it create a user in Exchange 2007 or deploy a Virtual Machine, a powershell script is generated, which you can use, reuse and tweek for your own requirments.
In my case I used it as a foundation for provisioning new VMs in Virtual Machine Manager 2007. Having created a VM Template (by sys-preping an XP install), I've been able to write a script which using one command can create a new VM, name it, install all our core software, generate a mac address & network card and join the domain!
I've spent the last 2 days trying to come up with a random MAC address generator in powershell, which I'm pasting below. It works a treat, and I'll be posting the full script (including the VM provisioning script) over the next couple of weeks. This random MAC generator is extreamly useful when wanting to give users the ability to create VMs on the fly, and after a lot of digging online I wasnt able to find anything like this...so hopefuly someone else can use it;
----------------------------------------------------------
param(
[int] $len = 12,
[string] $chars = "0123456789abcdef"
)
$bytes = new-object "System.Byte[]" $len
$rnd = new-object System.Security.Cryptography.RNGCryptoServiceProvider
$rnd.GetBytes($bytes)
#define the fields
$macraw = ""
for( $i=0; $i -lt $len; $i++ )
{
$macraw += $chars[ $bytes[$i] % $chars.Length ]
}
#add collons to the random macraw so that it is properly formatted
$macaddress = $macraw[0]+$macraw[1]+":"+$macraw[2]+$macraw[3]+":"+$macraw[4]+$macraw[5]+":"+$macraw[6]+$macraw[7]+":"+$macraw[8]+$macraw[9]+":"+$macraw[10]+$macraw[11]
$macaddress
----------------------------------------------------------
However, working on another project has lead me to look into powershell for creating Virtual Machines, and I've been blown away by what it can do.
The beauty of MS System Centre Products is that they all execute tasks using powershell, even if you use an admin console to create the task. You could quite happily never know that powershell was being used, and I imagine 90% of users never need to know. The brilliant thing is tha whenever you do something with the GUI, be it create a user in Exchange 2007 or deploy a Virtual Machine, a powershell script is generated, which you can use, reuse and tweek for your own requirments.
In my case I used it as a foundation for provisioning new VMs in Virtual Machine Manager 2007. Having created a VM Template (by sys-preping an XP install), I've been able to write a script which using one command can create a new VM, name it, install all our core software, generate a mac address & network card and join the domain!
I've spent the last 2 days trying to come up with a random MAC address generator in powershell, which I'm pasting below. It works a treat, and I'll be posting the full script (including the VM provisioning script) over the next couple of weeks. This random MAC generator is extreamly useful when wanting to give users the ability to create VMs on the fly, and after a lot of digging online I wasnt able to find anything like this...so hopefuly someone else can use it;
----------------------------------------------------------
param(
[int] $len = 12,
[string] $chars = "0123456789abcdef"
)
$bytes = new-object "System.Byte[]" $len
$rnd = new-object System.Security.Cryptography.RNGCryptoServiceProvider
$rnd.GetBytes($bytes)
#define the fields
$macraw = ""
for( $i=0; $i -lt $len; $i++ )
{
$macraw += $chars[ $bytes[$i] % $chars.Length ]
}
#add collons to the random macraw so that it is properly formatted
$macaddress = $macraw[0]+$macraw[1]+":"+$macraw[2]+$macraw[3]+":"+$macraw[4]+$macraw[5]+":"+$macraw[6]+$macraw[7]+":"+$macraw[8]+$macraw[9]+":"+$macraw[10]+$macraw[11]
$macaddress
----------------------------------------------------------
Monday

For the past week I’ve been looking at our new MD1000e blade enclosure. With the push towards virtualization and redundancy, blade architecture is obviously a major leap forward.... 2xBlade enclosures, clustered blade servers & SAN = 100% uptime..... in theory.
So far I’ve just been configuring the MD1000e chassis. For those who don’t know the chassis is the rack mountable unit which holds all the blade servers. It contains the PSUs, the fans and the network ports, which means your blades don’t contain any of the above and can be smaller in size. The MD1000e takes up 10u in a Dell cabinet, and can hold 16 servers. With standard poweredge servers we would like to get around 2 or 3 servers in a 10 u space.
The MD1000e has a myriad of features accessible from the web interface. My tip of the day is that when you first switch the MD1000e on and it asks “do you want to complete the configuration wizard now?”, DONT answer “no”. If you answer “no” the only way you can give the management port (CMC) and IP address is by hooking the unit up to a laptop and using a null modem lead.
Once configured, you can view the health of all your blades, start them up, shut them down etc etc. One beautiful feature is that you can assign IP addresses to the management port of any blades which might be plugged in. So you give the MD1000e 16 addresses to play with, and each time you plug a blade in, and IP will automatically be given to the blade’s iDRAC port. This is extremely important if you don’t have a kvm built into your MD1000e, or you don’t want to sit in front of 32 fans roughly equalling the power of a military class jet engine with a mouse and keyboard on your lap.
Using the iDRAC of each blade, you can connect to the server and install an OS as if you were sat in front of it.... actually you wouldn’t even be able to do it sat in front of it come to think of it. Using this you can load up an ISO or share your local drive to install 2008 or whatever OS you desire.
Getting the unit up and running initially isn’t a 2 minute job, but it’s worth the effort, and extremely impressive bit of kit!
Our blades will initially be getting server 2008 data centre edition installed, with the hyper-v role in clustered mode.
Wednesday
Whilst Microsoft seem to have published a lot of corporate vision statements about their VDI (Virtual Desktop Infrastructure) vision, they don’t actually seem to provide much in the way of technical roadmaps. As I am currently looking to deploy a full VDI, this is something I have been looking into closely, and here are some of my conclusions.

What we are looking to achieve; is a full desktop experience from a remote location. Ideally, this should be via a web browser, on any remote PC. The application for this is to allow staff to work from home or whilst on the move.
Currently a member of staff sits at their desk, and logs into an XP machine, and is presented with the pre-defined desktop, along with their redirected 'My Documents', their home area, and any crucial settings which we might choose to deploy. Of course they also have the core set of software such as Office, and MIS applications. What we want is an identical experience (or as near as possible) from a remote PC.
Microsoft's "vision" for this identifies several of their key technologies for this. Virtual Machine Manager, the System Centre Suite and Server 2008 Terminal Services. What they don’t yet seem to have is a way to put all this together to produce a working solution.
So what are the possible ways forward?
• Create a virtual PC for each member of staff who requires working from home, set the PC identical to the way any other staff PC is configured, and simply allow staff to Remote Desktop into the PC using ‘Remote Desktop. The PROS of this solution are that it’s simple to configure, and pretty much fool proof for the user. The cons are that it requires potentially a vast number of VMs, and systems management
• Allow staff to Remote Desktop into their own physical PC. PROS even easier to setup. CONS requires workstations to be left powered on, 110% chance of it not being workable!
• Use scripted HyperV, via the Virtual Machine Manager web portal, and powershell, to create VMs on the fly to start them up & shut them down according to usage. PROS sleek and sexy. CONS very complex to setup, potential for huge number of VMs
• Use Virtual Machine Manager / Hyper-v with Citrix. PROS Seems to have a reasonable amount of backing from MS partners. CONS Expensive, expensive & expensive!
We may have to revisit some of the above, but currently the leader is none of the above....it’s a product called MED-V which is currently in BETA. It’s another product “acquired” by M$ in a similar way to softgrid, so I can only assume it will become part of the System Centre Suite very soon.
The way it works (in principal) is that you create a Virtual PC (using Virtual PC 2007), and configure it as required. You then upload this to the Med-V server, which in turn clones it for clients over the net when the log onto the MedV server. This gives the user what appears as a virtual PC running on their desktop.... when running in full screen mode you are essentially sat in the office.
Obviously the setup is a little more complex as IP addressing, DNS and Active Directory all come into play to prevent conflicts, but the MED-V product does work... flawlessly so far once setup.
There are cons however. It requires a small client on the users machine, and the first time the user connects it takes an index of the users local PC. This is to reduce the amount of traffic which MEDV uses during connection. i.e. if you have a file called wibble.dll on your local pc, it won’t bother dragging it over your 500k connection every time a MEDV session requires it. This initial index takes a good 30 minutes on average. After that the user can expect to connect in the same time it takes to boot up a virtual PC.
Support for MEDV is currently non-existent, and you can expect to do a lot of self research if you are going to evaluate it. The setup process is complex and requires 2 server and at least 2 workstations, plus a virtual PC. I’m looking forward to an official release date, but with a bit of luck e may deploy the BETA to test users within a couple of months.
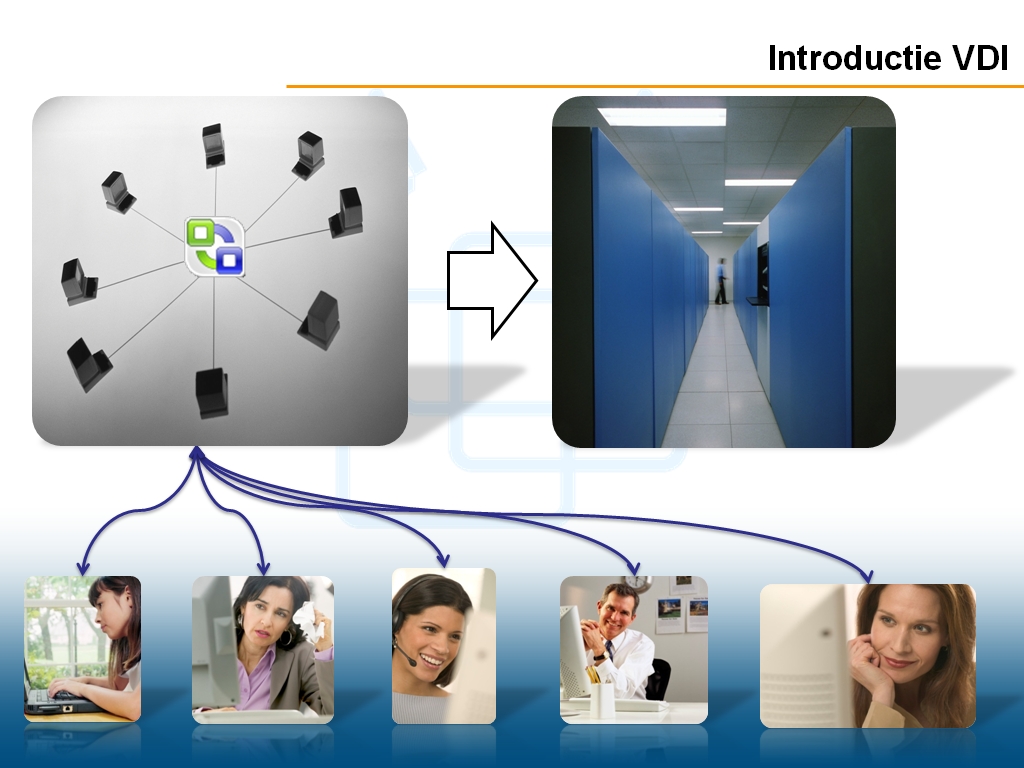
What we are looking to achieve; is a full desktop experience from a remote location. Ideally, this should be via a web browser, on any remote PC. The application for this is to allow staff to work from home or whilst on the move.
Currently a member of staff sits at their desk, and logs into an XP machine, and is presented with the pre-defined desktop, along with their redirected 'My Documents', their home area, and any crucial settings which we might choose to deploy. Of course they also have the core set of software such as Office, and MIS applications. What we want is an identical experience (or as near as possible) from a remote PC.
Microsoft's "vision" for this identifies several of their key technologies for this. Virtual Machine Manager, the System Centre Suite and Server 2008 Terminal Services. What they don’t yet seem to have is a way to put all this together to produce a working solution.
So what are the possible ways forward?
• Create a virtual PC for each member of staff who requires working from home, set the PC identical to the way any other staff PC is configured, and simply allow staff to Remote Desktop into the PC using ‘Remote Desktop. The PROS of this solution are that it’s simple to configure, and pretty much fool proof for the user. The cons are that it requires potentially a vast number of VMs, and systems management
• Allow staff to Remote Desktop into their own physical PC. PROS even easier to setup. CONS requires workstations to be left powered on, 110% chance of it not being workable!
• Use scripted HyperV, via the Virtual Machine Manager web portal, and powershell, to create VMs on the fly to start them up & shut them down according to usage. PROS sleek and sexy. CONS very complex to setup, potential for huge number of VMs
• Use Virtual Machine Manager / Hyper-v with Citrix. PROS Seems to have a reasonable amount of backing from MS partners. CONS Expensive, expensive & expensive!
We may have to revisit some of the above, but currently the leader is none of the above....it’s a product called MED-V which is currently in BETA. It’s another product “acquired” by M$ in a similar way to softgrid, so I can only assume it will become part of the System Centre Suite very soon.
The way it works (in principal) is that you create a Virtual PC (using Virtual PC 2007), and configure it as required. You then upload this to the Med-V server, which in turn clones it for clients over the net when the log onto the MedV server. This gives the user what appears as a virtual PC running on their desktop.... when running in full screen mode you are essentially sat in the office.
Obviously the setup is a little more complex as IP addressing, DNS and Active Directory all come into play to prevent conflicts, but the MED-V product does work... flawlessly so far once setup.
There are cons however. It requires a small client on the users machine, and the first time the user connects it takes an index of the users local PC. This is to reduce the amount of traffic which MEDV uses during connection. i.e. if you have a file called wibble.dll on your local pc, it won’t bother dragging it over your 500k connection every time a MEDV session requires it. This initial index takes a good 30 minutes on average. After that the user can expect to connect in the same time it takes to boot up a virtual PC.
Support for MEDV is currently non-existent, and you can expect to do a lot of self research if you are going to evaluate it. The setup process is complex and requires 2 server and at least 2 workstations, plus a virtual PC. I’m looking forward to an official release date, but with a bit of luck e may deploy the BETA to test users within a couple of months.

It's been 6 years since we were last hit by a major virus, but we have just been hit again (along with a few million others) by W32.Downadup.B
What did it do?: It removed ability of users to log-in to the domain. The following entry appeared in droves on domain controller; "The SAM database was unable to lockout the account of Administrator due to a resource error, such as a hard disk write failure (the specific error code is in the error data) . Accounts are locked after a certain number of bad passwords are provided so please consider resetting the password of the account mentioned above." with an event ID of 12294. At the peak we were probably experiencing around 100 per second.
The end result of the above was that due to the sheer number of requests, active directory was unable to authenticate genuine users....who were getting their account locked instead of getting logged in. Ironically this wasnt the main intension of the virus, just a side effect. In actual fact the virus looks to upload any passwords it finds to a remote server. In order to avoid detection the writers made it upload to a few thousand random domain names to avoid detection by the authorities.
Some more info;
http://www.microsoft.com/security/portal/Entry.aspx?Name=Worm%3aWin32%2fConficker.B
How did we get rid of it?: Firstly we had to disable every single account on the domain with local or domain/enterprise security rights. You can imagine the hassle this is going to cause in terms of service run-as issues. We also had to unplug any administrative workstations from the network and run all fixes direct from the servers.
Micrsoft have provided a tool for prevention, also provided in the form of a windows update (should you happen to do those on a weekly basis);
http://support.microsoft.com/kb/891716
They do however suggest that deployment via Group Policy is not suitable for servers, and kindly provide a handy 36!! step manual process. You can however reduce this to around 5 steps by using Symantec Antivirus, a bit of quick registry editing, and the removal tools.....probably 15 minutes per server. I'd also suggest regular password changing of any admin account you are using, just to ensure that it isnt grabbed and used by an infection.
The only method we have found thus far to remove the threat from an infected PC is to perform a full system scan using Symantec AV. Not great for the users given the load it puts on the workstations, but at least its a fix!
I'm sure this wont be the last such threat, and its been our first since moving to Active Directory.... but I'll be looking into how we can deploy windows updates using SCCM2007 on a regular basis!
Thursday
We have just been working on a niggly problem. We were trying to connect a spare nic in a Server 2008 server to a development network. The development network is currently just a switch with nothing else connected.
As soon as the second nic was plugged in, we lost all connectivity to the server from the main nic, and even lost ability to ping the server.
After a bit of head scratching we realised that although Windows Firewall was turned off, as soon as the second nic was plugged in the Firewall turned itself back on.... thus blocking pings and RDP.
Simple solution was obviously to plug in the connection, and then disable firewall.
As soon as the second nic was plugged in, we lost all connectivity to the server from the main nic, and even lost ability to ping the server.
After a bit of head scratching we realised that although Windows Firewall was turned off, as soon as the second nic was plugged in the Firewall turned itself back on.... thus blocking pings and RDP.
Simple solution was obviously to plug in the connection, and then disable firewall.
Tuesday
We have noticed that when Self Service Portal users are trying to alter the properties of one of their VMs, they have an option to mount an ISO. Down at the bottom of the options is a tick box which says "SHARE" rather than copy.
Normally if you mount an ISO, the ISO file will be copied into a subfolder of the VM before it is mounted. For a 4Gb ISO files (such as SuseLinux) this can take several minutes. So the obvious advantage of using the SHARE option is that it just uses the original ISO rather than creating a copy.
However....there is a catch. The option isnt available if your host if a Hyper-V server. I have logged this with MS via Technet; http://forums.microsoft.com/TechNet/showpost.aspx?postid=4167342&siteid=17
It seems to be a known issue, but as yet they havent given a resolution date.
Normally if you mount an ISO, the ISO file will be copied into a subfolder of the VM before it is mounted. For a 4Gb ISO files (such as SuseLinux) this can take several minutes. So the obvious advantage of using the SHARE option is that it just uses the original ISO rather than creating a copy.
However....there is a catch. The option isnt available if your host if a Hyper-V server. I have logged this with MS via Technet; http://forums.microsoft.com/TechNet/showpost.aspx?postid=4167342&siteid=17
It seems to be a known issue, but as yet they havent given a resolution date.
We have been having a serious issue with our latest Dell 755s. These PCs come with a built in 4 slot card reader. The A: drive is reserved for a floppy, C: is the local HDD, D: is taken by the DVD drive, leaving E, F, G & H for the card reader. I imagine 90% of network admins have set the users home area to default to H: which obviously causes a major problem when the user tries to log-in to a machine with a card reader. As a short term fix we have used a MS tool called devcon, which can disable devices from the command line. Ill post an update when we find a more long term solution.
Monday

Following on from a previous post on this topic, I have finally (after around 6 weeks of trying) been able to find a resolution to the issue I previous posted about here.
It turns out this this was not actually an issue with VMM being slow installing VM Components. VMM was actually being slow at reading the drives on the host server. thankfully someone from Microsoft jumped onboard (thanks Hector Linares), and was able to confirm that VMM2008 does have this issue if any of the following conditions are met;
VIRTUAL MEDIA: If the host server has any virtual media such as a Dell DRAC or Virtual Floppy.
GPT DISK: If any drives in the host server are using GPT Partition table rather than MBR
UNINITIALIZED DISK: If any of the disks are not initialized.
OTHER MOUNTED VHDs: If a VHD has mounted incorrectly or not dismounted correctly.
In our situation the problem was actually related to GPT. The server has 3 drives, 2 set up as MBR and one set up as GPT. Converting the one GPT disk to MBR instantly fixed the problem, and VMM now creates VMs in under 10 seconds.
As a side note, GPT drives was introduced by MS in Server 2003 SP1, but is really being pushed with server 2008. See this article by MS.
Hopefully MS will have a fix soon, but as of Nov 2008 there is no way of converting an MBR disk to GPT without loosing the data.
If you have installed and configured a Dell Poweredge Server, you may have noticed a "utility" partition which exists on the system drive....in our our case on the RAID 1 mirror which is our system drive.
For reasons I wont go into, it was suggested that we remove the dell system partition. The Server is a 2008 build, where the partition simply shows up in Storage Management, but you are unable to edit or delete it from there.
Dell's solution was to rebuild the entire server including OS. Great....
I decided there must be a quicker way so had a little expriment with DISKPART. Diskpart is a command line tool which allows you to foricbly remove a partition. As long as you are not trying to force remove a partition within a dynamic disk, this is a fairly straight forward process and is supposed to leave the rest of the drive (or mirror) in tact.
To cut a long store short....dont use DISKPART to force remove a DELL utility partition, it doesnt work, and it will leave you having to rebuild all the data contained on the same drive. Considering the Dell Utility Partition only contains data which is on a normal Dell boot CD, I really cant see the point in it.
For reasons I wont go into, it was suggested that we remove the dell system partition. The Server is a 2008 build, where the partition simply shows up in Storage Management, but you are unable to edit or delete it from there.
Dell's solution was to rebuild the entire server including OS. Great....
I decided there must be a quicker way so had a little expriment with DISKPART. Diskpart is a command line tool which allows you to foricbly remove a partition. As long as you are not trying to force remove a partition within a dynamic disk, this is a fairly straight forward process and is supposed to leave the rest of the drive (or mirror) in tact.
To cut a long store short....dont use DISKPART to force remove a DELL utility partition, it doesnt work, and it will leave you having to rebuild all the data contained on the same drive. Considering the Dell Utility Partition only contains data which is on a normal Dell boot CD, I really cant see the point in it.
Friday

We have recently introduced DFS paths onto the network, which offers some significant advantages over standard UNC paths. For those who dont know about DFS;
Click Here
In short.... DFS introduces virtual paths for AD users. Rather than have users going to a path such as "\\ServerName\\volume\file.doc", your users will go to a path such as "\\domain.com\storage\file.doc". The advantage to be gained certainly isnt in path lengths, but in the administration of the paths.
For example, lets say everyones home area points to "\\london\home\userid", and for whatever reason the server "london" is removed from the network. Not only do the files have to be restored to a new location, but everyones paths are going to have to point to the new locations. This includes their home area path, their profile path, and more importantly any links the users has in documents, spreadsheets or databases.
With DFS paths everyones home area can be directed to "\\domain.com\home\userid", and the same with their profile and any Group Policy directed folders. The user is still effecticvely pointing to a serevr, but as this is now being done dynamically if the server goes offline or the data ius migrated, all that needs changing is the DFS pointer. Brilliant.
There are some other advantages such as syncronisation and high-availablity, and I plan to look into these in the near future.
I should also point out another handy tool from Doverstones, which is AD-Find & Replace. This works in the same way as notepad's find & replace for example, but on Active Directory objects. So, if you need to change home area paths for thousands of users, this tool can do it in seconds;
Click Here
Wednesday
We recently decided to upgrade our 2003 Schema to support 2008. We already have a number of 2008 Servers in place, but the schema upgrade gives us the obvious advantage of being able to designate the 2008 servers as domain controllers. All our new builds are 2008, so this is starting to be a priority.
"Upgrading The Schema" is slightly worrying, no matter how many back-ups you have, and no matter how well you follow instructions.
We did have issue on our student network, and ended up having to log a call with MS, who were able to fix the problem via some manual changes to Active Directory. This only affected the schema upgrade enabling read only domain controller functionality. I'm not sure we will ever use a read only DC, but perhaps its something to consider for an off campus office.
Anyway, the steps for upgrading your 2003 Schema to 2008 are;
adprep.exe /forestprep Schema Master once per forest
adprep.exe /domainprep Infrastructure Master twice (once per domain)
adprep.exe /domainprep /gpprep Infrastructure Master twice (once per domain)
adprep.exe /rodcprep * Domain Naming Master once per forest
* Optional when you want to deploy Read Only Domain Controllers
The adprep tools are contained on the server 2008 DVD.... I'd suggest copying this to your DC's rather than running from the DVD drive. I'd also suggest checking your schema backups, and making sure that servers are running on a UPS.....you never know.
As a side note, I'll give a small plug for some software we have recently used by Doverstones;
http://www.dovestones.com/
FSMO Role: Ideal for the above situation if you dont know which servers hold roles.
Its simple and free!
"Upgrading The Schema" is slightly worrying, no matter how many back-ups you have, and no matter how well you follow instructions.
We did have issue on our student network, and ended up having to log a call with MS, who were able to fix the problem via some manual changes to Active Directory. This only affected the schema upgrade enabling read only domain controller functionality. I'm not sure we will ever use a read only DC, but perhaps its something to consider for an off campus office.
Anyway, the steps for upgrading your 2003 Schema to 2008 are;
adprep.exe /forestprep Schema Master once per forest
adprep.exe /domainprep Infrastructure Master twice (once per domain)
adprep.exe /domainprep /gpprep Infrastructure Master twice (once per domain)
adprep.exe /rodcprep * Domain Naming Master once per forest
* Optional when you want to deploy Read Only Domain Controllers
The adprep tools are contained on the server 2008 DVD.... I'd suggest copying this to your DC's rather than running from the DVD drive. I'd also suggest checking your schema backups, and making sure that servers are running on a UPS.....you never know.
As a side note, I'll give a small plug for some software we have recently used by Doverstones;
http://www.dovestones.com/
FSMO Role: Ideal for the above situation if you dont know which servers hold roles.
Its simple and free!
I appear to have a few people at Microsoft scratching their heads with an issue we are experiencing....and I dont think I'm the only one; When we create VMs (no matter how), VMM insists on a step called "installing VM components". This is when creating a VM on the Hyper-V host. It is my understanding that VMM should not carry out this step, if for example you are creating a machine with a blank HDD, or with a non supported OS such as Linux. However, this step runs every single time a VM is created. I will add that eventually it times out (15 minutes or so), and the VM does function perfectly. This might not seem an issue generally, but in a classroom where students may wish to create a VM from the portal, it becomes a problem. Firstly students tend to be a little inpatient....and secondly they cannot see the job list in the same way an administrator can, and probably give up thinking that it isnt going to work. We have tried creating a VM from a template....same problem, with a blank small HDD, large HDD, a template with "noi customization required".....but every single time VMM does the step and the creation hangs. Interestingly the error log says;
----------------------------- Warning (13226) Virtual hard disk W:\test907am\Blank Disk - Small.vhd cannot be mounted on host trent.students.blackburn.local because it conflicts with other disks. Recommended Action Wait a few moments and then try the operation again. -----------------------------
You can see my full report on Technet here; http://forums.microsoft.com/TechNet/ShowPost.aspx?PostID=4088882&SiteID=17
----------------------------- Warning (13226) Virtual hard disk W:\test907am\Blank Disk - Small.vhd cannot be mounted on host trent.students.blackburn.local because it conflicts with other disks. Recommended Action Wait a few moments and then try the operation again. -----------------------------
You can see my full report on Technet here; http://forums.microsoft.com/TechNet/ShowPost.aspx?PostID=4088882&SiteID=17
I now got around to upgrading the Beta of Virtual Machine Manager 2008, to the RTM version. MS have made quite a few changes....improvments.... and introduced one or two bugs (see my next post).
The splash screen for VMM Admin Console has changed significantly, and previous bugs which existed in relation to the storage of ISO's in a VMM Library have been corrected.
The porcess of Physical To Virtual Conversion on Windows 2000 machines has been introduced. More specifically Microsoft have enabled a feature called Offline Conversion. This basically installs a Windows PE images onto the source, boots it up into Windows PE to do the conversion, then creates it as a VM..... works a charm, although in testing we experienced downtime of around 1 hour as it was an old PC.
Another thing MS have fixed significantly is the web portal, which no longer takes 20 minutes to log in to. You can now give users the ability to create their own BLANK VMs, something which wasnt possible in the Beta, but will be ideal in a classroom scenario.
If you are upgrading from VMM2008 Beta to live, a word of warning. The agent on all your hosts will also require upgrading. This was very smooth for our test 2003 host, but became extreamly complex for a server 2008 hyper-v host. To cut a long story short... we had to manually remove the VMM agent from the host, uninstall hyper V, upgrade to the latest version of Hyper-v, then re-install the VMM agent. It worked, but there was a period of panic when we lost control, and ability to control any of the VMs on the HyperV host.
All in all this release is looking really good, and offers the obvious advantage of well supported management of Server 2008 HyperV Hosts. Sadly still no support from USB devices on a host/server (dongles etc), and no support for non domain member servers.....but you cant have it all.

The splash screen for VMM Admin Console has changed significantly, and previous bugs which existed in relation to the storage of ISO's in a VMM Library have been corrected.
The porcess of Physical To Virtual Conversion on Windows 2000 machines has been introduced. More specifically Microsoft have enabled a feature called Offline Conversion. This basically installs a Windows PE images onto the source, boots it up into Windows PE to do the conversion, then creates it as a VM..... works a charm, although in testing we experienced downtime of around 1 hour as it was an old PC.
Another thing MS have fixed significantly is the web portal, which no longer takes 20 minutes to log in to. You can now give users the ability to create their own BLANK VMs, something which wasnt possible in the Beta, but will be ideal in a classroom scenario.
If you are upgrading from VMM2008 Beta to live, a word of warning. The agent on all your hosts will also require upgrading. This was very smooth for our test 2003 host, but became extreamly complex for a server 2008 hyper-v host. To cut a long story short... we had to manually remove the VMM agent from the host, uninstall hyper V, upgrade to the latest version of Hyper-v, then re-install the VMM agent. It worked, but there was a period of panic when we lost control, and ability to control any of the VMs on the HyperV host.
All in all this release is looking really good, and offers the obvious advantage of well supported management of Server 2008 HyperV Hosts. Sadly still no support from USB devices on a host/server (dongles etc), and no support for non domain member servers.....but you cant have it all.

Well it seems that windows search 4.0 in a server 2003/xp environment just doesn't work. I have logged the problem with technet, and had no reply.
The scenario most people want, is that your server indexes your main file store, then all your clients reference the central index.... rather than having hundreds of clients creating their own local index and hammering the server.
We have installed index 4.0 on server 2003....it works a treat, and has indexed 1,000000+ files. Searching from the server produces fast and reliable results.
However, try to search a shared drive on the said sever from an xp client, and the results are rather less impressive. "no results found". My hunch would be that the clients don't have any reference to or access to the index, but MS give no documentation on what is supposed to be a supported situation.
Couple this with the fact that we have our user archives stored on a shared drive (another great non-supported but no solution scenario), and you'll appreciate how highly unimpressed I am with Microsoft's efforts at producing a working index and search feature.
The scenario most people want, is that your server indexes your main file store, then all your clients reference the central index.... rather than having hundreds of clients creating their own local index and hammering the server.
We have installed index 4.0 on server 2003....it works a treat, and has indexed 1,000000+ files. Searching from the server produces fast and reliable results.
However, try to search a shared drive on the said sever from an xp client, and the results are rather less impressive. "no results found". My hunch would be that the clients don't have any reference to or access to the index, but MS give no documentation on what is supposed to be a supported situation.
Couple this with the fact that we have our user archives stored on a shared drive (another great non-supported but no solution scenario), and you'll appreciate how highly unimpressed I am with Microsoft's efforts at producing a working index and search feature.
Tuesday
Subscribe to:
Posts (Atom)


